
The changes I’ve made.
I have been keeping a list of everything I have ever changed or it even into my motorcycle. My first motorcycle, I never did that, but the second one (current one), I have. I have added the complete list of everything that was ever, added, changed or replaced on my motorcycle. Some entries are duplicates.
Replaced:
2 Push rods (new, bought another set just in case)
1 set Clutch plates
2 rear Japanese drive chains
2 Maintenance Battery
3 Spark plugs
12 V CDI – replacement for 125 cc
8 post Stator
12 V Coil (Not Installed – replacement for 125 cc)
12 V Voltage Regulator/Rectifier – 5 wire (not installed -125 cc)
Big bore kit 200cc (complete set)(currently not installed)
Brazilian Honda 125 cc Wiring loom (complete)
All LED Lights
Regular Headlight to > Halogen headlight to >> LED headlight
Master Brake Reservoir Window on old levers
Master Brake switch on old levers
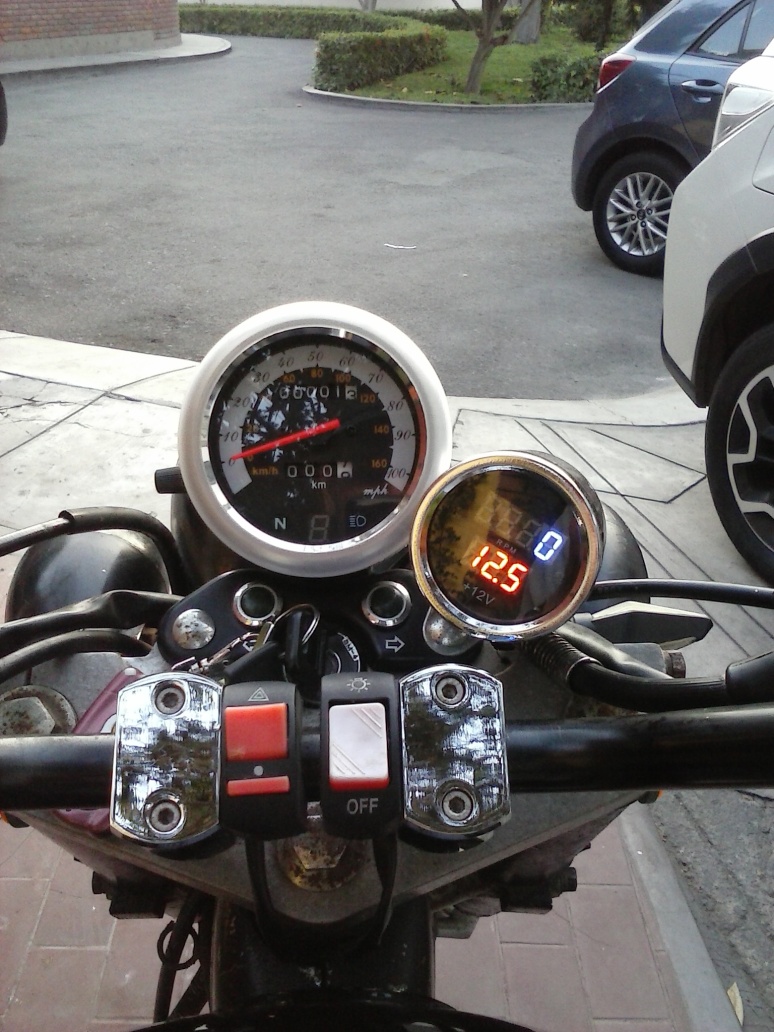
Speedometer Mph/Kmh with gear indicator, high beam, Neutral light
Digital tachometer with digital voltage meter
Turn Signals – Front and back – all LED’s
Running Lights – converted to Driving/Fog LED halogens
Front Saddle seat – recovered and modified
Back rest – recovered – removed
Rear foot pegs replaced
3.2 gallon Yamaha VX250 Fuel tank without fuel cap
Yamaha VX250 locking Fuel Cap
Custom Motorcycle grips – Black Aluminum with rubber
Motorcycle controllers (3rd pair)
PZ30 carburetor with Accelerator Pump (2nd one, brand new)
Throttle/Clutch Cables
12V small Horn (2nd one, high pitch, noisy)
2 Inline Glass fuses replaced with new Blade fuses and holders
1 Pair Custom rear mirrors with light reflectors
1 Vacuum based Petcock
1 Fuel line Blue
1 Pair LED License Plate Bolts (Replaced with another type)
1 Suzuki License LED Light with bracket
1 Custom rear Taillight with red LED bulb
1 Aluminum handlebars low profile-Black
1 Pair Aluminum Air valve caps
1 Pair Aluminum Alloy Chrome Risers
Rear Brake shoes & Front Brake Pads
2 Tire tubes front and rear
1 pair Aluminum grips (replaced with another set of grips)
1 pair Black/Silver motorcycle MB Cylinder/Clutch Levers for 22 mm handlebars
1 pair 12V 10 W Flasher Load Resistors for motorcycle LED lights
1 Motorcycle Cover (Waterproof, Outdoor UV Protector rain cover)
1 Motorcycle Sealed Waterproof Electrical wire connector plug set
Painted – Black:
Side covers
Engine
Exhaust
Chain guard
Triple tree shock covers
Air-Tube
Head Light housing
Running Light housing with light-bar
Prototypes – New:
Prototype modified vacuum intake manifold short (original)
Prototype Air-Tube with custom high flow Chrome Air Filter with custom linkage
Prototype 25.5 cm Aluminum Exhaust baffles with steel wool wrap
Added – New:
Exhaust wrap on exhaust custom coupler’s
4, Grade 12.2 M5 Cap bolts 35 mm for Chrome Risers
4, Grade 8.8 M5 locking bolts for Chrome Risers
2 External light switches – 1 flash/driving light switch, 1 battery/tachometer power switch
1 Secondary lighting wire loom
1 Electrical board (left side) which houses 6 LED fuse-box and Alarm System
1 Alarm system with custom light activation indicator – (currently disabled)
1 Pair License LED Bolts (Replaced with another type, listed below)
1 Brass Air Nozzle for original intake manifold
1 LED flash light relay
1 LED Fuse-box
1 Pair high volume Saddlebags
1 Pair Saddlebag brackets – Heavy Duty (bolted directed to the frame)
1 Bungee Cord for motorcycle battery
1 LED Suzuki License Plate Bracket – Black Aluminum
1 Custom Fuel Vacuum line
1 Air-Tube with custom high flow Chrome Air Filter with custom, made linkage
2 Custom Aluminum exhaust baffles – (25.5 cm each)
1 Inline Clear Fuel Filter
1 Fuel tank decal
4 Side cover “Defiance” decals
Fuel tank custom mounting hardware
Custom 3 way wire connectors within head light housing
Load Resisters Installation


I have since gotten my load resisters in and had to buy other load resistors here in Lima. Places that sold products online and the overseas online stores kept losing my orders, they would be shipped, then lost in the mail, what a frigging hassle. Wondering sometimes if they were even shipped at all. Anyways, I did load two of them into my turn signals, for both front and back, and they work, well. The other ones I bought were to be used inline with the LED fog/driving lights, which are on a secondary wiring loom. The heat sinks were mounted directly on the front light bar, so they get adequate cooling. I bought others but not sure if they are needed for the LED headlight and taillight. Everything I read says it is not necessary, but added one to the front light bar just in case. My digital tachometer I created an extra connection so that I can get the reading directly off of the coil. I tried the wire wrap, but it doesn’t have any readings what so ever. It did work once before but the reading were erratic due to a lose connection that has now been fixed. The license plate light was added since the LED bolts kept breaking, just due to bad design, now it is super bright. Fixed an issue with the 6 block LED fuse block, now permanently bolted to the inside cover.

There are some new issues I have to addressed, like the front fender in cracked at the bolt and looks like someone took sandpaper to the one side. Thinking about making a new fender directly from fibre-glass or just place it with an aluminium one instead. Either way it will be more durable and light weight. Saddlebags need to be blacked out again and a new strap added to the one side, since these are now bolted directly to the frame. The are starting to look old and worn out. The frame still needs to be painted and still checking for new or used motors bigger than the one installed, to be replaced.
Main Wiring fixed
With all the work that I was doing to my motorcycle, some how, the main wiring separated an left me with a dead battery. Well, today a week after I bought my new motorcycle battery (Oxford YB7B-BS, 12V 7Ah) maintenance free. I decided to go through and find out why the system wasn’t charging. Before I had started worked on it, took it out for a few test runs and the whole time it wouldn’t charge.
So, I thought i would look around and see if I could see anything on why it wasn’t charging, and I found the problem. I have a main red line that runs from the fuse box to the front wiring cluster. This line was separated, thus not allowing the system to actually charge the battery. There is a connector that connects these two main wires. Even the new digital voltage gauge always just showed 12.5 V charge. After puting in a patch cable and covering the ends so that it won’t arc, and put it back under the tank, I briefly started the bike, and this time actually showed 14.4 volts. Which means the system was charging as it is suppose too.
So, now the wiring is all set. I can now kick it over and go for a nice run without any hassles. Should now have enough power to run the other accessories and new digital gauge.
Now just have to get my load resistors and wire them into the wiring system. Four 50 Watt 6 Ohm resistors for the 4 turn signals, 4 canbus load resistors for the main-light/tail-light LED’s and secondary fog/driving LED’s. Since now, all lights on the bike are LED’s, except for the a few in the speedo unit. But I already have LED’s for that and eventually I will replace them with that.
Forgot to mention got my fuse panel installed on the left side of the compartment, attached the fuse box to the outside, the alarm to the inside, and still have room to get the compartment box sit it there correctly. But eventually, I think that box should be alumium to replace the plastic one. But that is down the road and I am not worried at this point. Now just waiting on my new lever, had to order them from someone else cause the place I was buying from keep losing the package in the mail.
There service was great up until October of 2017, then just got extremely slow, to the point where, had to wait 90 days (3 months) to find out if they would even deliver your package. Talk about a waste of time. And all they say to you at the end, “sorry about the delay”, that is not a delay, that is bullshit.
The other thing, that really got me is, if you order one product and they send something completely different, I would figure the store would contact you and say, “I sorry but we do not have that product in stock, would you except something else?” But get this, they don’t, and they still expect you to pay for a product you didn’t even order. What is that, some more friggin bullshit, and this is how you do business, are you kidding me.
Phase 3 near completion
Well after a just over a year working on the modifications to my mini cruiser, phase 3 is almost done. Had some major hickups, mostly from a company that was suppose to deliver my parts around the 35 day marks, decided to take almost twice as long. Talk about pissing you off. Not cool, and lost my future business.
So, what i ordered was a speedo for the bike (Suzuki), and what did I get a custom air filter for a Harlet Davidson. Someone f*cked up really bad on that, worst again took about 60 days to get to me to find out some asshole couldn’t even send the right part for the right bike. So, ya, reordered it through the regular company, but this time end up getting the one that just has the readings in kilometers only.
But worst part, this was a start to just a bad batch of screwed up orders. So, I decided that I am going to just stay with the guys who deliver on time and not have to make you wait for friggin 60 or 90 days, specially to find out if someone screwed up or decided to be an asshole and send you a damaged part. The one company will compensate you but the second company they are more geared to the seller than to the buyer sort of, a “kiss my ass” attitude. So getting your money back sometimes is a really friggin hassle. Worst is that you go to them out of good faith and they turn around and do this to your face, this is just “BAD business”. Anyone I deal with face to face will hear about who, so they can avoid this same crap.
So, my cap screws came in yes, the shipping is super slow. And with my grips, which has surface damage and somebody some how managed to screw up the counter sunk hex bolt. I did manage to file the ends with my mini specialty files, so that the rough edges are gone. But they lack a markings that was suppose to be on the grips, from a certain company. Again not cool.
That cap screws will have to be filed down a little, I got the M5x35mm but really need the M5x30mm, I got them extra long on purpose. And my license plate back with leds. But I found out this is slightly smaller on mine bike, even though I did measure it and it was the right size. So, did the one that they sent me for a different bike, no matter I will make it fit, like I do with everything else.
So, I also got on my license plate bolts again, someone hit my motorcycle and broke the mounting hardware on the light. Where did this happen?, at my house, talking about pissing you off. I am pretty sure, I know who it was, that did it and didn’t say anything. Cause he has done, it before. So, I am not going to name, names.
So, this weekend, I get to put my new grips on, hopefully I will get my risers back on, after I grind off 5 mm, off of the cap bolts on 4 of the bolts. The chrome risers really look good on that bike. Did manage to put an extra, kill switch on the bike to cut off all electrial power after the key is turned off.
Just like the new speedo and digital tachomter and voltage gauge, with really enhance the front of the bike. And also, it looks like i will have to get a new igintion switch after all. I tried to fix it last time, it did work for a little while but now have the time the power just doesn’t stay on, or what I should do is change the connectors so that it fixes the issue with the one connector.
Just have to find why the electrical is draining somewhere, but not sure where. System just doesn’t seem to charge, will also have to run some electrical tests and see if it is even charging the battery. Anyways that is it for now.


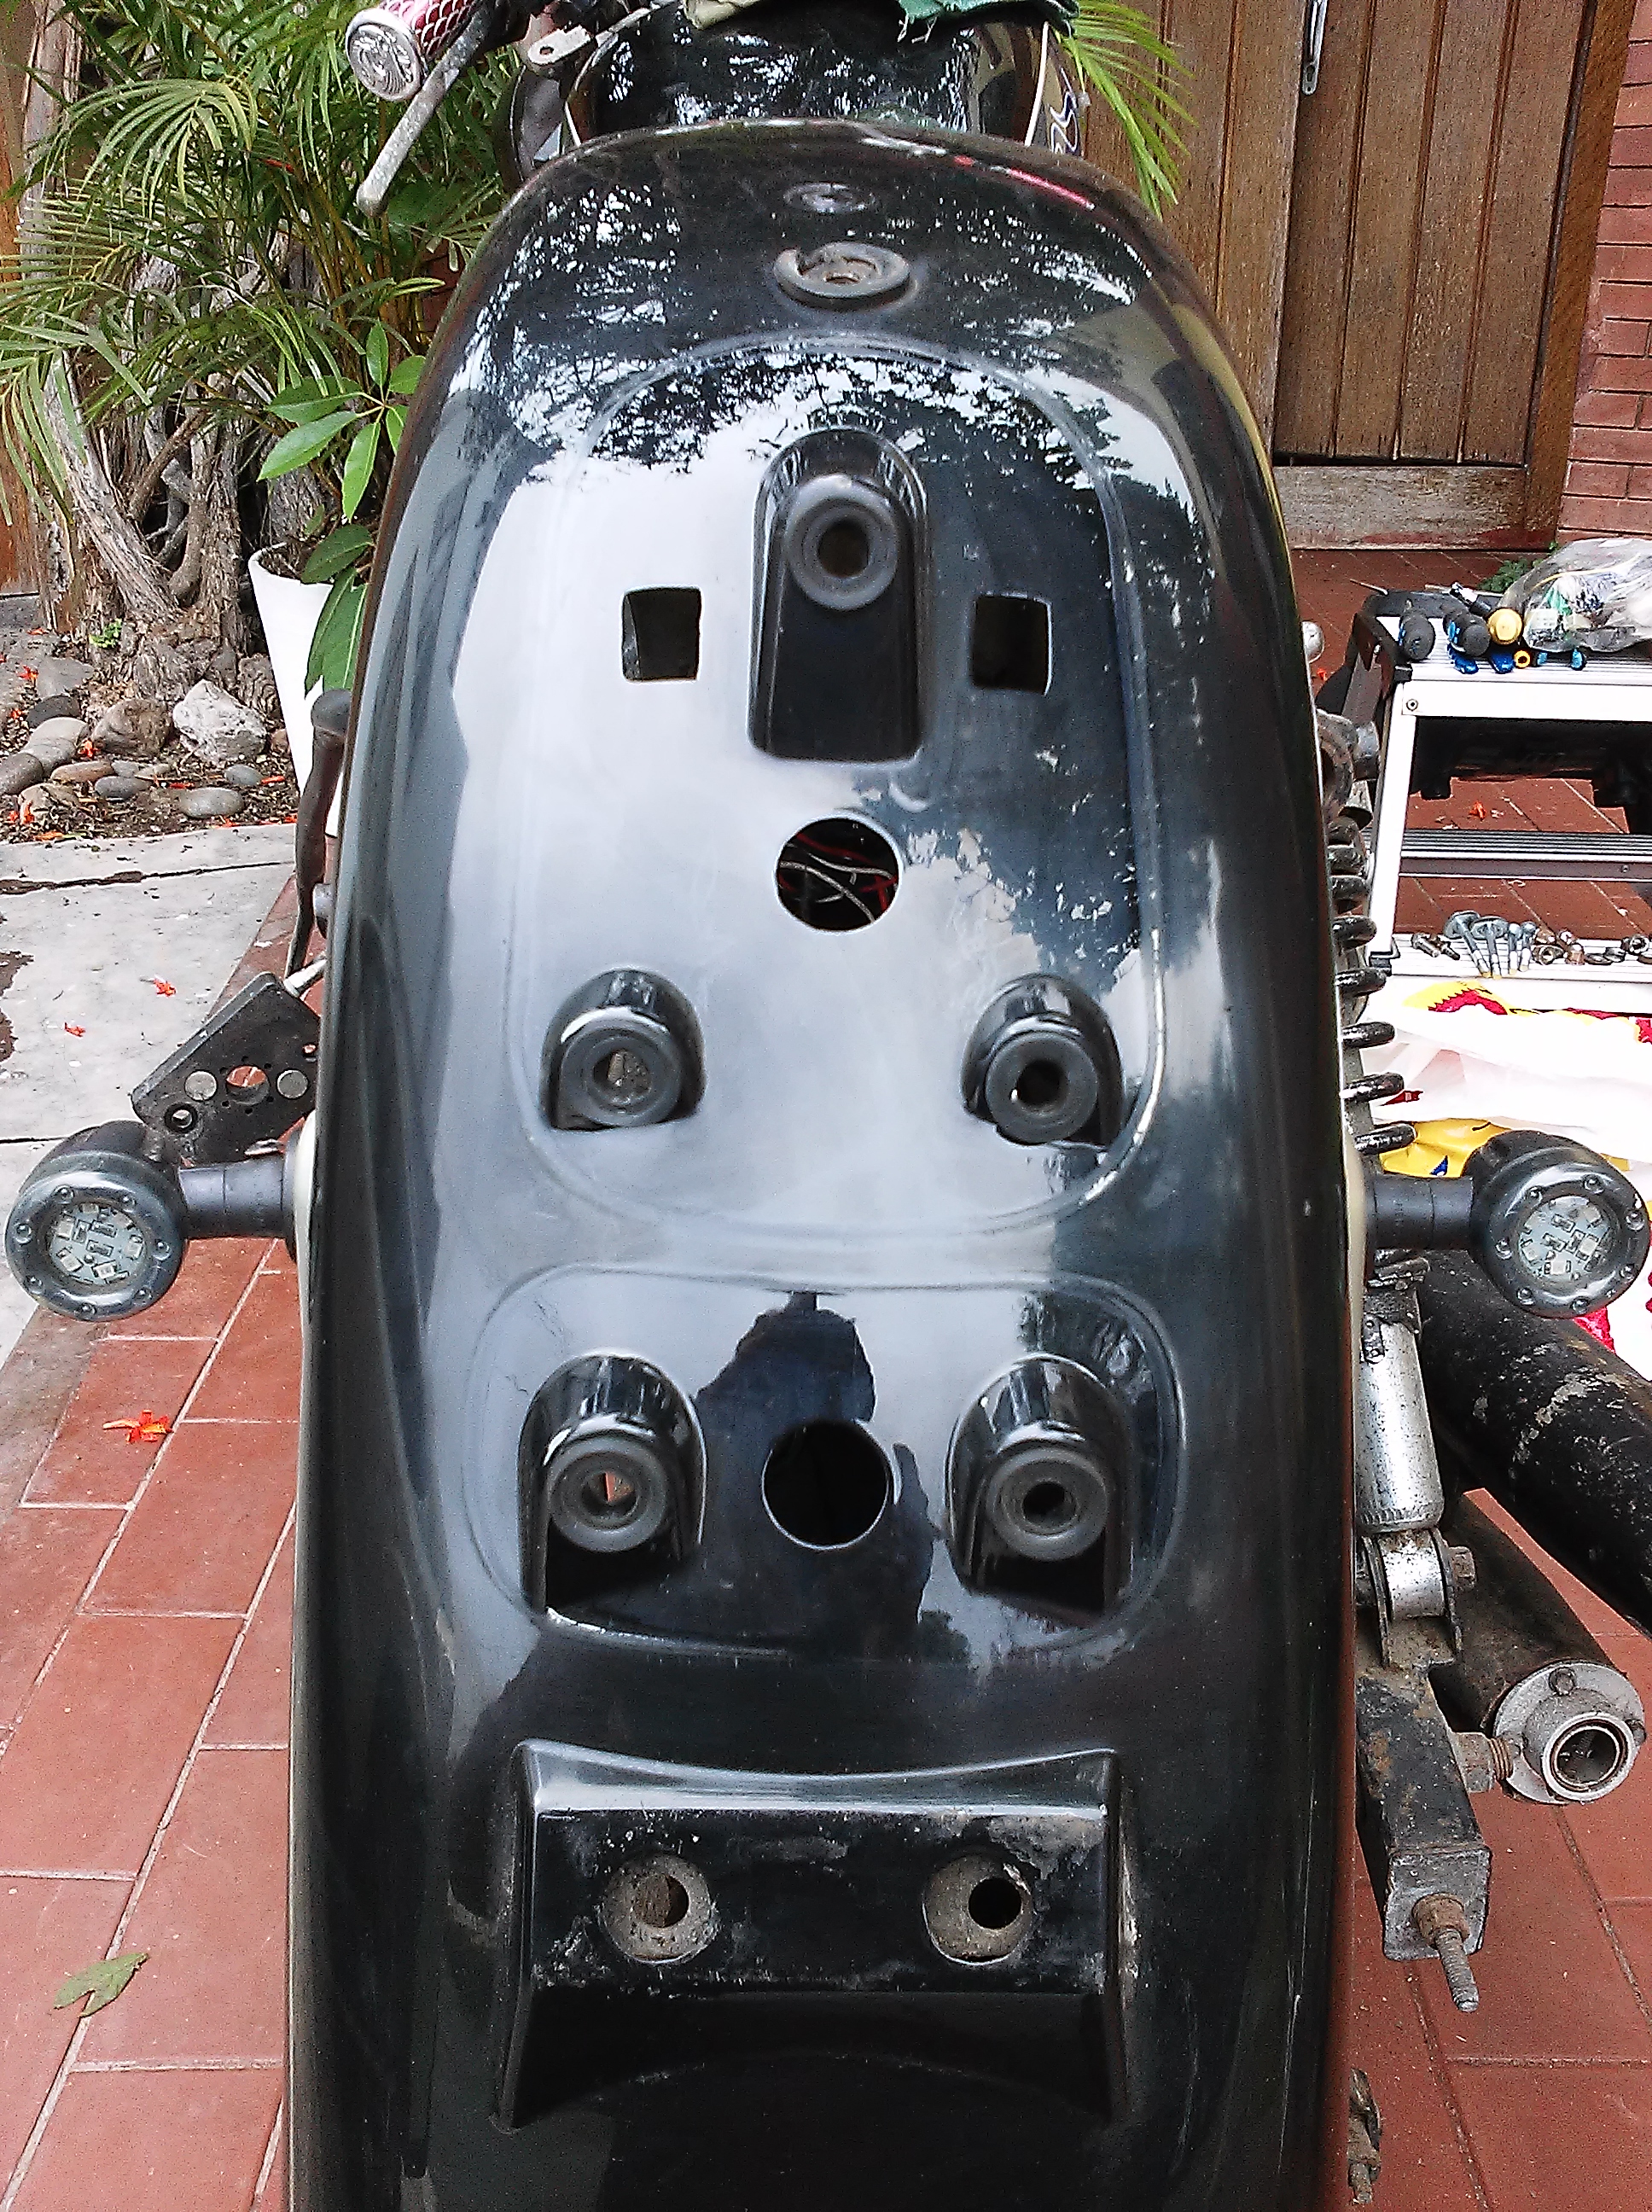
Fender is Mounted

Fender is mounted again, this time with a new tail light and license plate LED’s. The result looks much better than it use to look, more sleek and stylish. Still going to order the other license plate holder with LED’s, since it is small and it will blend into the other flow lines of the back. Just have correct the signals and everything should work correctly.
Fender
Well, I got the fender back and I ended up mounting the LED light, but not quite done with it, have some minor fixes with mounting the light for a nice fit. The top part of the light is roughly about a 10mm from the surface and the bottom is about 25mm away from the surface. There are two little problems, one where the wires come in the hole has to be bigger to fit the end of the light socket, cause it hits the fender, have to countersink it. And the other is bottom part of the light also hits the fender, (which is where the other hole is, under the mounting holes) it has to also be counter sunk so the light sorta sits in it “own mold” sort of speak. Then the sides of the light housing will have to be slightly curved to flow on the curve of the fender.
The other issue I had to change was the license plate LED bolts, to have them separate. I am also going to add another bracket with some LED lights. The is only because the license plates bolts break to easily (specially if someones strap gets caught on it).


Phase 1
Well I decide to make these sections, new phases. So, just about to complete phase one, which consists of changing the back tail light. The fender went to the shop and they ended up fibre-glassing it, they shaved all the previous mounting holes and filled in all the holes in the one section. In the process one of the previous parts, I ordered, broke so I ended up ordering 2 new sets, thus giving me extras just in case the next one breaks, here I wouldn’t be surprised if they tried to steal them from the bike. Hell, they steal everything that isn’t riveted down to a car, that is no joke. So, on a motorcycle it is easier to steal, alarm systems don’t make any difference cause no listens to them anyway. I redid the wiring harness again, I goofed when I put in a replacement wire, but have since repair all that was damaged. I recreated two new wiring loops and one for the front headlight assembly and one for the rear taillight assembly, which should accommodate for all the new LED lights. I installed a 6 contact fuse box, instead of have just one fuse for all connections. Right now it is attached to the tool box, but it will be moved over to the side panel, where it will be on the outside, instead of the inside that I was thinking of previously. This way you can see at a glance what fuses are blown, if any. The concept is pretty simple, one line into the fuse box and six lines out, 2 will be spares for now or until I add in a new light system, or stereo. So, 4 leads out to the alarm system, LED relay, secondary light system and main line. All will have all there main fuses box the fuse box will have fuses that are rated lower than the actually ones that are in the main holders, why do you ask? Simple if there is any problems in the electrical it will blow first instead of travelling down the line and melting it out. Had that happen a couple times now.
Phase 2 will consist of changing the risers, handlebars to aluminium or aluminium alloy, speedometer which hopefully will be just for km/h and new gauges which will be just digital. I already have what I want marked and just a matter of buying them and getting them shipped here.
Phase 3 will be setting up the new tool box which will be made of aluminium instead of plastic, and adding in the side panel to mount all the electrical including the fuse box.
Phase 4 will be the final step of changing the motor, since this will probably better than trying to rebuild my current one.
May 2017 Updates


First, I should start and tell you what happened, I was about to go for a ride and meet my partner. When I got on the bike it was running and when to turn on the lights but I hit the switch really fast and a second later all the lights went off and wouldn’t come back on. As it turns out the the main line that runs from the battery to the ignition switch fired out. They (manufacturer that made the wiring loom) used 20-22 AWG wire for the main line. Well the power that I was pushing through it could not handle it, and the wire burnt out somewhere inside to the plastic housing. So, I cleaned up the original wiring from my previous loom, and ended up putting some new connectors on and rewired it onto the frame alongside my secondary wiring loom. There were some issues that I noticed with this wiring loom. That is that there is only 1 fuse that covers the the entire loom, no matter what you install on it. This is not acquit so I have decided to install a mini fuse box, with atleast 4 terminals non it. This should save on how many fuses, I don’t need to go through:
1 for the ignition switch,
2 for the secondary wiring loom,
3. for the alarm system,
4 for a spare.
I also altered the original intake manifold and added the new brass nozzle and reinstalled that back onto the motorcycle, wow, what a difference this does, since the intake was ported to the carburetor, runs much better than all the other after market intake manifolds. The newest edition will be with a LED fuse box. Now the beautiful thing about this fuse box is you can see, if a fuse is blown before you replace it, with a LED light preview. You can still leave the same rating for that line and add a lighter fuse to that it protects the line from current damage, if any happens. So, this past weekend all the parts from the previous shipment came in. Now my brake light came in and when I when put it I notice the stupid manufacturer put extra holes and mounts on it to mount the light housing in various steps. And in order for me to apply my new light, i would have to shave off the existing mounting holes to a accommodate the new rear tail light. So, what I did , I removed the license light and replaced the new license plates LED bolts in, looks, already better. Also removed the rear rack, I think it looks better, what do you think? Now, also added the running lights which a blue to a new switch which I can turn on and off at will. Still need to fix the issue with the turn signals, have to trace the right wiring for the turn signals. But atleast I have a new LED tester to track the right wires in the head light and get the right ones hooked up.


New Parts again!
Well, my master cylinder repair kit came in along with the replacement fluid window. I really find this amazing, all the stuff you can’t get for your motorcycle down here. You would think that a country that has atleast a million motorcycles would have the parts available, but they don’t. I had to order mine in from overseas. So, this Saturday I am going to do my brakes. My extra light switch also made it in and my new exhaust tape will be in very soon too.

Oh, I forgot to mention the wiring loom I bought and installed on my bike actually has a area for dual signal and brake lights. There was a connector that I could figure out where it attached to so last weekend I did a test and sure enough it does actually that. So here I can mount extra brake/signal lights or maybe some cool flashy LED’s, haven’t decided yet. This also means that the front has the same thing. So, was this wiring loom for some type of ATV?
